


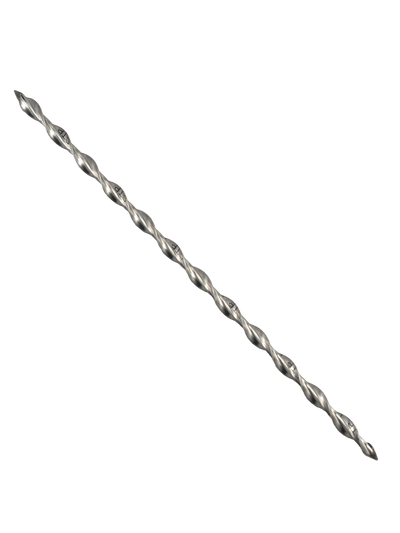
Stitch-Tie Stainless Steel Masonry Pinning Solution - Box of 100 (8mm)
Stitch-Tie Stainless Steel Masonry Pinning Solution - Box of 100 (8mm) - 3" / 304 Stainless Steel is backordered and will ship as soon as it is back in stock.
Safe & Secure Payments

-
Sale
Prosoco
Concrete Hardener, Densifier and Dustproofer - LS/CS
Sale price$61.30 – $227.25Save up to $25.25Unit price -
-
Sale
Prosoco
Sale price $291.75 Was: Regular price $320.93 Save $29.18Unit price -
-
Sale
Prosoco
Cat 5 R Guard Elastomeric Weatherproofing Membrane
Sale price$793.50 – $17,670.00Save up to $1,963.33Unit price -
-
Sale
-
-
Sale
Prosoco
Prosoco Consolideck LS Lithium Silicate Concrete Densifier
Sale price$398.16 – $428.50Save up to $70.50Unit price -
-
Sale
Prosoco
Cleaner/Degreaser Commercial-Strength Detergent
Sale price$288.73 – $9,981.33Save up to $1,109.04Unit price -
-
Sale
Prosoco
Consolideck BD1 Concrete Floor Densifier & Hardener
Sale price$909.58 – $6,298.67Save up to $699.85Unit price -
-
Sale
Prosoco
First Cut Concrete Slurry Cleaner
Sale price $295.58 Was: Regular price $325.14 Save $29.56Unit price -
-
Sale
Prosoco
DensiKure Concrete Curing Compound
Sale price $368.08 Was: Regular price $404.89 Save $36.81Unit price -
-
Sale
Prosoco
R Guard Porous Prep Water-Based Sealer - Case of 4 Gallons
Sale price $399.20 Was: Regular price $439.12 Save $39.92Unit price -
-
Sale
-
-
Sale
Prosoco
First Cut with Densifier - 5 Gallon
Sale price $363.58 Was: Regular price $399.94 Save $36.36Unit price -
-
Sale
-
-
Sale
Prosoco
R-Guard FastFlash Liquid Flashing & Waterproofing Compound
Sale price$655.60 – $684.33Save up to $68.43Unit price -
-
Sale
Prosoco
R Guard Fast Flash Roller Grade Waterproofing Membrane Compound - 2 Gallons
Sale price $354.73 Was: Regular price $390.20 Save $35.47Unit price -
-
Sale
-
-
Sale
-
-
Sale
Prosoco
R-Guard Cat 5 Rain Screen Air & Water Barrier Membrane - 5 Gallon
Sale price $833.17 Was: Regular price $916.49 Save $83.32Unit price -
-
Sale
Prosoco
R Guad Cat 5 ICF Fluid Applied Air & Water Barrier Membrane
Sale price$793.50 – $17,670.00Save up to $1,963.33Unit price -
-
Sale
Prosoco
Prosoco Asphalt Tar Remover - 25 Gallons
Sale price $1,070.83 Was: Regular price $1,177.91 Save $107.08Unit price -
-
Sale
Prosoco
Prosoco Sure Klean 101 Lime Solvent Concentrated Masonry Cleaner
Sale price$444.58 – $818.58Save up to $81.86Unit price -
-
Sale
Prosoco
Natural Stone Treatment WB Water Repellent
Sale price$298.07 – $354.83Save up to $35.48Unit price -
-
Sale
Prosoco
Natural Stone Treatment Water Repellent
Sale price$399.07 – $474.00Save up to $47.40Unit price -
-
Sale
Prosoco
Saltguard Penetrating Water and Salt Barrier
Sale price$343.47 – $398.33Save up to $39.83Unit price -
-
Sale
Prosoco
VB Vapor & Air/Water Resistive Barrier
Sale price $276.25 Was: Regular price $303.88 Save $27.63Unit price -
-
Sale
Prosoco
Siloxane PD Pre-Diluted Water Repellent - Bulk
Sale price$2,583.17 – $6,650.67Save up to $738.96Unit price -
-
Sale
Prosoco
R Guard Joint & Seam Filler - Bulk
Sale price$17,742.20 – $23,797.50Save up to $1,252.50Unit price -
-
Sale
Prosoco
R-Guard Spray Wrap MVP Air & Water-Resistive Barrier - Bulk
Sale price$2,601.50 – $7,021.33Save up to $780.15Unit price -
-
Sale
Prosoco
Sale price $19,748.00 Was: Regular price $21,942.22 Save $2,194.22Unit price -
-
Sale
Prosoco
R-Guard FastFlash Liquid Flashing & Waterproofing Compound - Pallet
Sale price$21,287.00 – $28,575.00Save up to $3,175.00Unit price -
-
Sale
Prosoco
First Cut with Densifier - 55 Gallon
Sale price $3,758.33 Was: Regular price $4,134.16 Save $375.83Unit price -
-
Sale
Prosoco
Blended Densifier Concrete Surface Hardener - Bulk
Sale price$2,716.08 – $6,298.67Save up to $699.85Unit price -
-
Sale
Prosoco
Consolideck Guard EXT Exterior Concrete Protective Coating - 55 Gallon
Sale price $5,850.17 Was: Regular price $6,435.19 Save $585.02Unit price -
-
Sale
Prosoco
Prosoco Sure Klean Tilt-Up Klean Bond Breaker Residue Cleaner - 55 Gallon
Sale price $3,553.92 Was: Regular price $3,909.31 Save $355.39Unit price -
-
Sale
Prosoco
Saltguard WB Water-Based Chloride Screening Sealer - Bulk
Sale price$3,356.83 – $7,693.33Save up to $854.82Unit price -
-
Sale
Prosoco
Saltguard Penetrating Water and Salt Barrier - Bulk
Sale price$4,214.83 – $9,880.00Save up to $1,097.78Unit price -
-
Sale
Prosoco
Natural Stone Treatment Water Repellent - Bulk
Sale price$5,036.17 – $13,064.00Save up to $1,451.56Unit price -
-
Sale
Prosoco
Natural Stone Treatment WB Water Repellent - Bulk
Sale price$3,785.83 – $9,432.62Save up to $510.91Unit price -
-
Sale
-
-
Sale
-
-
Sale
Prosoco
Concrete Hardener, Densifier and Dustproofer - LS/CS - Bulk
Sale price$2,277.00 – $8,157.58Save up to $815.76Unit price -
-
Sale
Prosoco
Sale price $8,681.20 Was: Regular price $9,549.32 Save $868.12Unit price -
-
Sale
Prosoco
All Surface Cleaner and Degreaser - 55 Gallon
Sale price $2,757.33 Was: Regular price $3,033.06 Save $275.73Unit price -
-
Sale
Prosoco
Strippable Masking Temporary Protective Coating
Sale price $603.42 Was: Regular price $663.76 Save $60.34Unit price -
-
Sale
-
-
Sale
Prosoco
Iron Stain Remover - Case of 4
Sale price $843.40 Was: Regular price $927.74 Save $84.34Unit price -
-
Sale
Prosoco
Enviro Klean 2010 All Surface Cleaner and Degreaser
Sale price$86.64 – $279.92Save up to $27.99Unit price -
-
Sale
-
-
Sale
Prosoco
PROSOCO BMC II White/Pastel Base Color Coating - 5 Gallon
Sale price $694.83 Was: Regular price $764.31 Save $69.48Unit price -
-
Sale
Prosoco
PROSOCO BMC II Tint Base - Water Repellent Color Coating
Sale price $662.67 Was: Regular price $728.94 Save $66.27Unit price -


Product Description
Stitch-Tie Stainless Steel Masonry Pinning Solution — Dry-Set Veneer Re-Anchoring Without Epoxy
The Stitch-Tie is a Type 304 stainless steel helical masonry anchor designed for re-anchoring existing veneers to backup structures without tearing down or replacing facades. Engineered for masonry restoration contractors and structural repair crews, it installs dry-set into pre-drilled pilot holes using a rotary hammer SDS drill and a spring-loaded or economy setting tool — no epoxies or adhesives required. The spiral geometry causes the tie to thread itself into the surrounding material, establishing load-carrying connections between wythes in both tension and compression for out-of-plane resistance.
Unlike traditional remedial anchors that require adhesive injection or exposed hardware, the Stitch-Tie leaves only a small pilot hole that is easily patched and concealed, preserving the visual and historical integrity of existing masonry. The helical shape provides a flexible in-plane connection between wythes while not drawing walls together, which means no induced tension forces between wythes are generated by the installation. Stitch-Ties can also be field-trimmed with cutters to meet optimum length requirements on site.
Technical Specifications
| Specification | Details |
|---|---|
| Material | Type 304 Stainless Steel (ASTM A-167) |
| Available Diameters | 6mm, 8mm (~5/16"), 10mm (~3/8") |
| Available Lengths | 3", 4", 6", 7", 8", 9", 10", 12", 14", 16", 18", 20" (custom lengths available) |
| Special Order Finish | 316 Stainless Steel (special order); Single Point flat end (special order) |
| Installation Method | Dry-set; no epoxies or adhesives required |
| Installation Tool | Heavy-duty spring-loaded setting tool or economy setting tool mounted on rotary hammer SDS drill |
| Pilot Hole Method | Percussion hammer drill (3-jaw chuck type) through mortar joint or facade material |
| Connection Type | Helical/spiral shape; flexible in-plane connection between wythes |
| Loading Resistance | Tension and compression (out-of-plane) |
| Weather Suitability | All weather conditions |
| Anchor Spacing (typical) | One anchor per 2 sq ft of veneer area (refer to local building codes for compliance) |
| 8mm Yield Strength | 93–108 ksi (640–745 N/mm²) |
| 10mm Yield Strength | 119–128 ksi (820–880 N/mm²) |
| 8mm Cross-Sectional Area | 0.016–0.020 in² (10–13 mm²) |
| 10mm Cross-Sectional Area | 0.020 in² (13 mm²) |
| 8mm Ultimate Shear Load | 1,169 lb (5,200 N) |
| 10mm Ultimate Shear Load | 1,686 lb (7,500 N) |
| 8mm Elastic Modulus | 21,191–22,625 ksi (146.1–156.3 GPa) |
| 10mm Elastic Modulus | 21,584 ksi (148.8 GPa) |
| 8mm Helix Angle | 32.14°–40° |
| 10mm Helix Angle | 50° |
| 8mm Pitch Length | 0.59–0.79 in. (15–20 mm) |
| 10mm Pitch Length | 1.0 in. (25.4 mm) |
| Ultimate Shaft Buckling (8mm, 1" unsupported) | 1,425 lb |
| Ultimate Shaft Buckling (10mm, 1" unsupported) | 2,335 lb |
| Field Trimming | Can be field-trimmed with cutters for optimum length |
Key Features & Benefits
Dry-Set Installation — No Epoxy or Adhesives
The Stitch-Tie threads itself into the surrounding material under the percussion action of a rotary hammer, eliminating the need for adhesive injection, mixing, or cure time. This speeds up the workflow significantly and removes weather-dependent adhesive cure concerns from the job.
Helical Shape Provides Flexible In-Plane Connection Without Inducing Wall Tension
The spiral geometry of the tie creates a flexible in-plane connector between wythes while simultaneously resisting out-of-plane loading in both tension and compression. Critically, the Stitch-Tie does not draw walls together, so no tension forces are induced between wythes during or after installation.
Nearly Invisible Repairs — Preserves Historical Integrity
Installed through small pilot holes in mortar joints, the tie recesses automatically upon installation and is then patched flush. The result is a repair that leaves virtually no visible evidence of work, making this solution suitable for historic preservation and architecturally sensitive facades.
All-Weather Installation
Unlike adhesive-based systems that can be sensitive to temperature, humidity, or substrate moisture, the Stitch-Tie can be installed in any weather conditions. This keeps restoration and anchoring projects on schedule regardless of site conditions.
Self-Threading with No Hole Cleaning Required
Once the pilot hole is drilled, the helical tie threads itself into the material as it is driven. Pilot holes do not require cleaning prior to installation, reducing prep steps and labor time per anchor.
Wide Range of Diameters and Lengths — Field Trimmable
With diameters from 6mm to 10mm and lengths from 3" to 20", plus the ability to field-trim with standard cutters, the Stitch-Tie accommodates a broad range of veneer thicknesses, cavity widths, and backup conditions on a single jobsite.
Common Applications
Re-Anchoring Brick Veneer to Concrete Backup
Where wall ties have corroded or gone missing, Stitch-Ties are installed through the bed joint of the outer wythe and embedded a minimum of 1-1/4" into the concrete backup, restoring the structural connection without facade removal.
Re-Anchoring Brick Veneer to CMU Backup (Hollow or Solid)
Stitch-Ties penetrate the outer wythe and embed into the CMU face shell and beyond, with minimum embedment depth determined by face shell thickness plus 1" into the backup material.
Re-Anchoring Brick Veneer to Wood Stud Backup
For wood stud backup structures, the Stitch-Tie is driven through the veneer and into the stud with a minimum embedment of 1-1/2" to 3", providing a secure mechanical connection using only the 8mm diameter tie.
Re-Anchoring Brick Veneer to Metal Stud Backup (16 Gauge)
The 8mm Stitch-Tie connects brick veneer to 16-gauge metal stud framing through a pilot hole drilled through both the bed joint and the stud face, creating a positive mechanical interlock without adhesive.
Crack Stitching and Veneer Repair
Stitch-Ties can be horizontally pointed in bed joints to reinforce cracked brick veneers, stitching across cracks — including stairstep and vertical patterns — to restore structural continuity without full facade replacement.
Re-Anchoring to Clay Tile Backup
For facades backed by clay tile, the anchor length is calculated to achieve effective embedment equal to two face shell thicknesses plus 1" into the tile backup, with the pilot hole drilled through the outer wythe.
Compatible Materials
- Brick (solid and cored)
- Concrete (precast and cast-in-place)
- CMU — hollow and solid (lightweight and normal weight, 4" through 12")
- CMU — grouted, lightweight
- Clay tile hollow backup
- Stone (granite, travertine, limestone)
- Wood stud (2×4, 2×6)
- Metal stud (16 gauge)
- Mortar joints
- OSB (7/16")
- Plywood
Product Documents
Application Instructions
Preparation
- Consult the drill bit sizing chart to select the correct pilot hole diameter for your facade material and Stitch-Tie diameter (8mm or 10mm).
- Determine correct anchor length based on veneer thickness, cavity width, and minimum embedment depth required for the backup material type.
- Note: Pilot hole depth should be greater than anchor length by a minimum of 1" for concrete/CMU backups, or 1/2" minimum for wood and metal stud backups.
Step 1 — Drill Pilot Hole
- Using a percussion hammer drill (3-jaw chuck type), drill a pilot hole through the mortar joint of the facade material at the specified diameter and depth.
- Drilling through the mortar joint is preferred; drilling through brick is acceptable where mortar quality is questionable.
- Pilot holes do not require cleaning after drilling.
Step 2 — Load Setting Tool
- Insert the Stitch-Tie into the dry-set installation tool (heavy-duty spring-loaded or economy type) mounted on the rotary hammer SDS drill.
Step 3 — Drive the Anchor
- Drive the Stitch-Tie into the pilot hole until the nose of the dry-set installation tool is hard against the veneer face.
- The percussion action of the drill creates the driving force that causes the spiral tie to thread itself into the surrounding material.
Step 4 — Recess and Patch
- The dry-set installation tool automatically recesses the Stitch-Tie below the face of the masonry upon seating.
- Patch the pilot hole with appropriate mortar or patching compound to conceal the installation.
Frequently Asked Questions
Q: Does the Stitch-Tie draw the veneer and backup structure together when installed?
A: No. The Stitch-Tie does not draw walls together. Its design ensures that no tension forces are induced between wythes during or after installation — it resists out-of-plane loading in both tension and compression without pulling the two substrates toward each other.
Q: Can Stitch-Ties be installed in wet or cold weather?
A: Yes. Because Stitch-Ties are dry-set and require no adhesives or epoxies, they can be installed in any weather conditions without concern for adhesive cure times or temperature-sensitivity.
Q: What is the typical anchor spacing for veneer re-anchoring work?
A: Unless otherwise specified, Stitch-Tie anchors are typically installed at one anchor per 2 square feet of veneer area to be retrofitted. Always refer to local building codes and standards for spacing compliance requirements.
Q: Can the Stitch-Tie be used to repair cracked masonry, not just re-anchor veneers?
A: Yes. Stitch-Ties can be horizontally pointed in the bed joint to reinforce cracked brick veneers — including stairstep and vertical cracks — functioning as a crack stitching reinforcement element without requiring facade demolition.
Q: Can anchors be adjusted to non-standard lengths on site?
A: Yes. Stitch-Ties can be field-trimmed using cutters to achieve optimum length requirements for specific site conditions.
Q: What drill bit size should I use?
A: Bit size depends on both the Stitch-Tie diameter and the facade and backup material combination. For example, an 8mm tie driven through a mortar joint into a concrete backup typically uses a 1/4" bit in the mortar joint and a 7/32" bit in the concrete. Refer to the full drill bit sizing chart in the Installation Guide for your specific material combination.
-
Sale
Husqvarna
Husqvarna Hepa Dust Extractor - 130 H
Sale price $6,253.20 Was: Regular price $6,948.00 Save $694.80Unit price -
-
Sale
Husqvarna
Husqvarna K 540i Power Cutting Saw
Sale price $944.10 Was: Regular price $1,049.00 Save $104.90Unit price -
-
Sale
-
-
Sale
Husqvarna
Sale price $2,444.40 Was: Regular price $2,716.00 Save $271.60Unit price -
-
Sale
-
-
 Sale
SaleHusqvarna
Sale price $1,614.60 Was: Regular price $1,794.00 Save $179.40Unit price -
 Sale
SaleHusqvarna
Sale price$118,153.29 – $122,841.00Save up to $13,649.00Unit price -
Sale
Husqvarna
Sale price $5,635.80 Was: Regular price $6,262.00 Save $626.20Unit price -


