


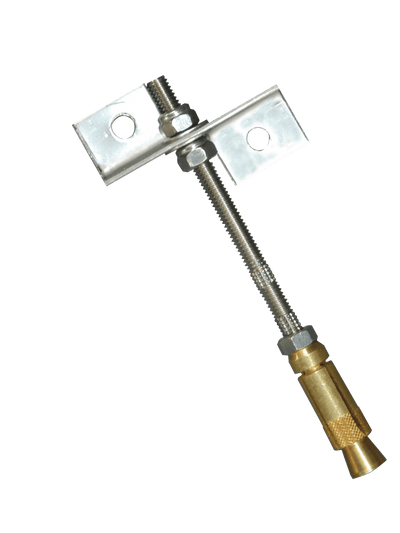
Facade-Tie System Restoration Anchor - Box of 100
Facade-Tie System Restoration Anchor - Box of 100 - Facade Tile Bracket with Grip Tie is backordered and will ship as soon as it is back in stock.
Safe & Secure Payments

-
Sale
Prosoco
Concrete Hardener, Densifier and Dustproofer - LS/CS
Sale price$61.30 – $227.25Save up to $25.25Unit price -
-
Sale
Prosoco
Sale price $291.75 Was: Regular price $320.93 Save $29.18Unit price -
-
Sale
Prosoco
Cat 5 R Guard Elastomeric Weatherproofing Membrane
Sale price$793.50 – $17,670.00Save up to $1,963.33Unit price -
-
Sale
-
-
Sale
Prosoco
Prosoco Consolideck LS Lithium Silicate Concrete Densifier
Sale price$398.16 – $428.50Save up to $70.50Unit price -
-
Sale
Prosoco
Cleaner/Degreaser Commercial-Strength Detergent
Sale price$288.73 – $9,981.33Save up to $1,109.04Unit price -
-
Sale
Prosoco
Consolideck BD1 Concrete Floor Densifier & Hardener
Sale price$909.58 – $6,298.67Save up to $699.85Unit price -
-
Sale
Prosoco
First Cut Concrete Slurry Cleaner
Sale price $295.58 Was: Regular price $325.14 Save $29.56Unit price -
-
Sale
Prosoco
DensiKure Concrete Curing Compound
Sale price $368.08 Was: Regular price $404.89 Save $36.81Unit price -
-
Sale
Prosoco
R Guard Porous Prep Water-Based Sealer - Case of 4 Gallons
Sale price $399.20 Was: Regular price $439.12 Save $39.92Unit price -
-
Sale
-
-
Sale
Prosoco
First Cut with Densifier - 5 Gallon
Sale price $363.58 Was: Regular price $399.94 Save $36.36Unit price -
-
Sale
-
-
Sale
Prosoco
R-Guard FastFlash Liquid Flashing & Waterproofing Compound
Sale price$655.60 – $684.33Save up to $68.43Unit price -
-
Sale
Prosoco
R Guard Fast Flash Roller Grade Waterproofing Membrane Compound - 2 Gallons
Sale price $354.73 Was: Regular price $390.20 Save $35.47Unit price -
-
Sale
-
-
Sale
-
-
Sale
Prosoco
R-Guard Cat 5 Rain Screen Air & Water Barrier Membrane - 5 Gallon
Sale price $833.17 Was: Regular price $916.49 Save $83.32Unit price -
-
Sale
Prosoco
R Guad Cat 5 ICF Fluid Applied Air & Water Barrier Membrane
Sale price$793.50 – $17,670.00Save up to $1,963.33Unit price -
-
Sale
Prosoco
Prosoco Asphalt Tar Remover - 25 Gallons
Sale price $1,070.83 Was: Regular price $1,177.91 Save $107.08Unit price -
-
Sale
Prosoco
Prosoco Sure Klean 101 Lime Solvent Concentrated Masonry Cleaner
Sale price$444.58 – $818.58Save up to $81.86Unit price -
-
Sale
Prosoco
Natural Stone Treatment WB Water Repellent
Sale price$298.07 – $354.83Save up to $35.48Unit price -
-
Sale
Prosoco
Natural Stone Treatment Water Repellent
Sale price$399.07 – $474.00Save up to $47.40Unit price -
-
Sale
Prosoco
Saltguard Penetrating Water and Salt Barrier
Sale price$343.47 – $398.33Save up to $39.83Unit price -
-
Sale
Prosoco
VB Vapor & Air/Water Resistive Barrier
Sale price $276.25 Was: Regular price $303.88 Save $27.63Unit price -
-
Sale
Prosoco
Siloxane PD Pre-Diluted Water Repellent - Bulk
Sale price$2,583.17 – $6,650.67Save up to $738.96Unit price -
-
Sale
Prosoco
R Guard Joint & Seam Filler - Bulk
Sale price$17,742.20 – $23,797.50Save up to $1,252.50Unit price -
-
Sale
Prosoco
R-Guard Spray Wrap MVP Air & Water-Resistive Barrier - Bulk
Sale price$2,601.50 – $7,021.33Save up to $780.15Unit price -
-
Sale
Prosoco
Sale price $19,748.00 Was: Regular price $21,942.22 Save $2,194.22Unit price -
-
Sale
Prosoco
R-Guard FastFlash Liquid Flashing & Waterproofing Compound - Pallet
Sale price$21,287.00 – $28,575.00Save up to $3,175.00Unit price -
-
Sale
Prosoco
First Cut with Densifier - 55 Gallon
Sale price $3,758.33 Was: Regular price $4,134.16 Save $375.83Unit price -
-
Sale
Prosoco
Blended Densifier Concrete Surface Hardener - Bulk
Sale price$2,716.08 – $6,298.67Save up to $699.85Unit price -
-
Sale
Prosoco
Consolideck Guard EXT Exterior Concrete Protective Coating - 55 Gallon
Sale price $5,850.17 Was: Regular price $6,435.19 Save $585.02Unit price -
-
Sale
Prosoco
Prosoco Sure Klean Tilt-Up Klean Bond Breaker Residue Cleaner - 55 Gallon
Sale price $3,553.92 Was: Regular price $3,909.31 Save $355.39Unit price -
-
Sale
Prosoco
Saltguard WB Water-Based Chloride Screening Sealer - Bulk
Sale price$3,356.83 – $7,693.33Save up to $854.82Unit price -
-
Sale
Prosoco
Saltguard Penetrating Water and Salt Barrier - Bulk
Sale price$4,214.83 – $9,880.00Save up to $1,097.78Unit price -
-
Sale
Prosoco
Natural Stone Treatment Water Repellent - Bulk
Sale price$5,036.17 – $13,064.00Save up to $1,451.56Unit price -
-
Sale
Prosoco
Natural Stone Treatment WB Water Repellent - Bulk
Sale price$3,785.83 – $9,432.62Save up to $510.91Unit price -
-
Sale
-
-
Sale
-
-
Sale
Prosoco
Concrete Hardener, Densifier and Dustproofer - LS/CS - Bulk
Sale price$2,277.00 – $8,157.58Save up to $815.76Unit price -
-
Sale
Prosoco
Sale price $8,681.20 Was: Regular price $9,549.32 Save $868.12Unit price -
-
Sale
Prosoco
All Surface Cleaner and Degreaser - 55 Gallon
Sale price $2,757.33 Was: Regular price $3,033.06 Save $275.73Unit price -
-
Sale
Prosoco
Strippable Masking Temporary Protective Coating
Sale price $603.42 Was: Regular price $663.76 Save $60.34Unit price -
-
Sale
-
-
Sale
Prosoco
Iron Stain Remover - Case of 4
Sale price $843.40 Was: Regular price $927.74 Save $84.34Unit price -
-
Sale
Prosoco
Enviro Klean 2010 All Surface Cleaner and Degreaser
Sale price$86.64 – $279.92Save up to $27.99Unit price -
-
Sale
-
-
Sale
Prosoco
PROSOCO BMC II White/Pastel Base Color Coating - 5 Gallon
Sale price $694.83 Was: Regular price $764.31 Save $69.48Unit price -
-
Sale
Prosoco
PROSOCO BMC II Tint Base - Water Repellent Color Coating
Sale price $662.67 Was: Regular price $728.94 Save $66.27Unit price -


Product Description
Facade-Tie System Restoration Anchor Interior Re-Attachment Without Exterior Scaffolding
The Facade-Tie System is a masonry restoration anchor designed for contractors performing facade re-anchoring on existing structures. It allows brick, stone, block, precast, and similar veneer facades to be re-attached from the interior of the structure, eliminating the need for exterior scaffolding entirely. The system operates via a mechanical bracket that connects the veneer to interior wood or metal studs, stabilizing the facade from moving further and replicating or supplementing the tie integrity of the original anchoring scenario. It is well suited for renovation, remodeling, build-out, and damage repair projects where preserving the exterior appearance and controlling project costs are priorities.
Unlike conventional facade repair methods that require drilling through the outer veneer surface, the Facade-Tie System's interior re-connection process leaves the exterior face of the cladding completely intact — no drilled holes, no mortar patch matching, and no aesthetic compromise. The bracket's split-plate interface connection transfers veneer live loading to the building via shear through dual screw fasteners made of compatible materials, providing reliable, measurable load resistance.
Technical Specifications
| Specification | Details |
|---|---|
| Application | Re-attaches facades of brick, stone, block, precast, etc. from the interior of the structure |
| Installation Method | Interior re-connection; no exterior scaffolding required |
| Connection Type | Mechanical bracket system with split-plate interface connection |
| Anchor System Options | Stitch-Tie® System (helical anchor) or Grip-Tie System (threaded anchor) |
| Material Options | Stainless steel (aggressive/caustic air environments) or galvanized (galvanized steel studs and interior applications) |
| Anchor Materials | Stainless steel and/or brass components |
| Corrosion Resistance | Yes — corrosion-resistant materials for long-term durability |
| Exterior Surface Impact | No drilled holes or aesthetic compromise to outer veneer surface |
| Bracket Out-of-Plane Resistance | 600 lb ultimate |
| Anchor Diameters Available | Grip-Tie: 3/8", 1/2"; Stitch-Tie: 8mm, 10mm |
| Stud Compatibility | Metal studs or wood studs |
| Bracket Attachment | Dual screw fasteners (Tek screw for metal stud; SS screw for wood stud) |
| Typical Tie Spacing — Enhanced Loading | 1 tie per 1.67 sq ft (16" H × 16" V) |
| Typical Tie Spacing — Basic Loading | 1 tie per 2.0 sq ft (16" H × 18" V) |
| Typical Tie Spacing — Extended | 1 tie per 2.67 sq ft (16" H × 24" V) |
| Grip-Tie Anchor Torque | 50–100 in-lbs (verified through onsite testing) |
| Pilot Hole Depth into Cladding | 2-1/2" minimum |
| Hole Spacing from Stud Face | Approximately 1/4" to 3/4" from side of stud face |
| Catalog Part Numbers (Mill Galvanized Bracket) | With Grip-Tie (A-Series): 62130-FTHH; With Stitch-Tie (B-Series): 62135-FTHH |
Key Features & Benefits
No Exterior Scaffolding Required
All installation work is performed from inside the structure, eliminating the cost and scheduling burden of exterior scaffolding. This is especially significant on multi-story buildings or projects in tight urban sites where erecting exterior access systems is expensive or logistically difficult.
Preserves Exterior Aesthetics
Because the veneer is never drilled from the outside, there are no holes to patch and no mortar color-matching required. Contractors can complete facade stabilization without leaving any visible evidence of the repair on the building exterior.
Two Proven Anchoring Options — Stitch-Tie and Grip-Tie
The system is compatible with both the Stitch-Tie® helical anchor and the Grip-Tie threaded anchor, giving contractors flexibility to select the best anchor type based on the facade material, installation conditions, and available interior space. Both systems provide installation adjustability, added veneer stiffness, and substantial tension/compression load-resistant qualities.
Mechanical Bracket with Reliable Load Transfer
The bracket's split-plate interface connection transfers veneer live loading to the building structure via shear, providing a dependable, engineered connection rather than relying on adhesive or chemical bonding alone. The bracket achieves 600 lb ultimate out-of-plane resistance, and the dual fastener attachment creates a positive, verifiable connection to the stud.
Easy Post-Install Quality Control
The mechanical nature of the connection — including torque verification for the Grip-Tie at 50–100 in-lbs and the Stitch-Tie's bracket rotation adjustment — means the installer can confirm a proper connection at each anchor location during the installation process. This supports quality assurance on the jobsite without the need for specialized testing equipment.
Corrosion-Resistant Material Options for Long-Term Durability
The stainless steel bracket and anchor option is designed for use in aggressive or caustic air environments where long-term corrosion resistance is critical. The galvanized option is suited for applications involving galvanized steel studs and standard interior environments, allowing specifiers to match material selection to exposure conditions.
No Weather Delays
Because installation is performed entirely from the interior of the structure, work can proceed regardless of exterior weather conditions. This keeps projects on schedule and reduces the risk of weather-related delays that would affect exterior repair methods.
Common Applications
Hurricane Damage Repair
Re-anchors dislodged or compromised facade veneers following wind and storm events without requiring exterior access or disturbing the outer face of the cladding.
Termite Damage Repair
Restores facade attachment integrity in structures where interior framing has been compromised by termite activity, allowing the veneer to be re-connected to new or repaired studs.
Flood Damage Repair
Stabilizes facades on structures that have experienced water intrusion and structural movement, re-establishing the tie connection between veneer and framing from the interior.
Fire Damage Repair
Re-attaches veneer facades that have become disconnected as a result of fire damage to the interior framing or original anchor system.
Building Repurposing and Renovation
Fortifies and stiffens existing masonry veneers during remodeling, build-outs, or basic building renovations where the original tie system no longer meets current performance requirements.
New Framing Tie-In
Connects existing exterior masonry veneers to new interior framing installed as part of a building retrofit or interior structural upgrade.
Compatible Materials
- Face brick (standard and hollow)
- Solid brick
- Stone veneer
- Concrete block (CMU) — hollow and solid
- Precast concrete panels
- Hollow clay tile
- Interior metal studs (galvanized bracket option)
- Interior wood studs (galvanized or stainless steel bracket options)
Product Documents
Application Instructions
Grip-Tie System Installation
- Drill an appropriate sized hole for the anchor selected (3/8" or 1/2") through the sheathing and into the cladding material 2-1/2" deep. Space the hole approximately 1/4" to 3/4" from the side of the stud face.
- Remove drill debris with a brush or blown air.
- Thread the 501 setting tool onto the shaft of the Grip-Tie until the tool bottoms out.
- Slide the tool and anchor assembly through the drilled hole until the washer contacts the brick face. Tighten the anchor to a torque of 50–100 in-lbs (verified through onsite testing). Remove the tool after the anchor has been set.
- Thread one (1) provided SS locknut onto the anchor shaft and position it roughly at the center of the stud width.
- Slide on one (1) SS washer provided and the bracket. Secure the bracket with the two (2) provided attachment screws to the stud.
- Assemble the remaining SS washer and locknut onto the exposed shaft and tighten until contact with the bracket is made. Installation complete.
Stitch-Tie System Installation
- Drill an appropriate sized pilot hole for the anchor selected, 3/16" to 5/16" (verified through onsite testing), through the sheathing and into the cladding material 2-1/2" deep. Space the hole approximately 1/4" to 3/4" from the side of the stud face.
- Install the 8mm or 10mm Stitch-Tie helical anchor into the cladding material using the hammer action from a rotary hammer drill.
- Insert the Facade-Tie Bracket over the helical anchor, positioned roughly at the center of the stud width. Rotate the bracket slightly to remove any slop within the system.
- Attach the Facade-Tie Bracket to the stud with the two (2) provided attachment screws. Installation complete.
Frequently Asked Questions
Q: Will the Facade-Tie System pull the veneer back tight against the structure?
A: No. Whether the Stitch-Tie or Grip-Tie system is used, the primary goal is to stabilize the veneer from moving any further. The system will not pull the veneer material back to the base structure.
Q: What is the difference between the Stitch-Tie and Grip-Tie anchor options?
A: The Stitch-Tie uses a helical anchor that is driven into the substrate via hammer action from a rotary hammer drill, requiring only a small pilot hole and no connection hardware or bending for the anchor-to-bracket connection. The Grip-Tie is a threaded anchor torqued to 50–100 in-lbs, secured with stainless steel lock nuts and washers, and suited for applications where installation conditions or facade integrity make the Stitch-Tie system less appropriate. Selection depends on performance requirements and installation conditions.
Q: How do I select the correct anchor length?
A: Measure from the interior face of the stud to the interior face of the existing veneer (Dimension A). This face-to-face measurement determines the required anchor length for both the Stitch-Tie and Grip-Tie systems. Length selection tables based on stud depth (4" or 6" backup) are provided in the submittal document.
Q: What material option should I specify for coastal or chemically aggressive environments?
A: Specify the stainless steel bracket option for connections in aggressive or caustic air environments. The galvanized bracket option is suited for galvanized steel studs and standard interior applications.
Q: What tie spacing should I use?
A: For enhanced loading applications, use one tie per 1.67 square feet (16" horizontal × 16" vertical). For basic loading applications with an increased safety factor, use one tie per 2.0 square feet (16" horizontal × 18" vertical). An extended spacing of one tie per 2.67 square feet (16" horizontal × 24" vertical) is also referenced in the planning guide.
Q: What types of facade materials is the Facade-Tie System compatible with?
A: The system is compatible with facades built of brick (face, solid, and hollow), stone, block (hollow and solid CMU), precast concrete, and hollow clay tile, among other masonry veneer types.
-
Sale
Husqvarna
Husqvarna Hepa Dust Extractor - 130 H
Sale price $6,253.20 Was: Regular price $6,948.00 Save $694.80Unit price -
-
Sale
Husqvarna
Husqvarna K 540i Power Cutting Saw
Sale price $944.10 Was: Regular price $1,049.00 Save $104.90Unit price -
-
Sale
-
-
Sale
Husqvarna
Sale price $2,444.40 Was: Regular price $2,716.00 Save $271.60Unit price -
-
Sale
-
-
 Sale
SaleHusqvarna
Sale price $1,614.60 Was: Regular price $1,794.00 Save $179.40Unit price -
 Sale
SaleHusqvarna
Sale price$118,153.29 – $122,841.00Save up to $13,649.00Unit price -
Sale
Husqvarna
Sale price $5,635.80 Was: Regular price $6,262.00 Save $626.20Unit price -


